[NDC21-비주얼아트&사운드] Making-Hard-Su
https://m.youtube.com/watch?v=emeTkdTQgGA&pp=ygUKbmRjIGVtYmFyaw%3D%3D

Hello, my name is Erich Hallberg and I'm a 3D artist at Embark Studios. Hello, my name is Erik Hallberg and I'm a 3D artist at Embark Studios. My main focus at Embark is ensuring a high quality level for 3D assets and enabling a large content scope for our projects through better content creation tools. I've previously worked in the film industry and at EA Dice on Battlefield 4 and 5 and Star Wars Battlefront as a 3D artist, weapons artist and level artist. This talk is for anyone who is making or is interested in making hard surface assets for games, be it either props, vehicles or weapons, or hard surface details such as armor and gear for characters. At Embark, we have been changing the way we build hard surface assets for our games. In this presentation, I will discuss our process for automating hard surface asset creation, leaving our artists with creating only the simplest input possible. We will go through our take on automatic UVs, automatic high polys and automatic baking. We will see what our workflow looks like and then take a look at each step of our procedural process as well as discussing the overall philosophy guiding the development of our tools. After this introduction I will discuss the most common current workflows for creating hard surface game art. Then I will go over why large parts of what it takes to make good hard surface assets can be automated. That leads into how our process takes care of most technical non-artsy stuff so that artists don't have to think or even know about those steps happening. Finally, I'll talk about what we've learned and how it's likely that our process will evolve as we develop it further. So now a brief look at the most common current workflows for creating hard surface game assets.
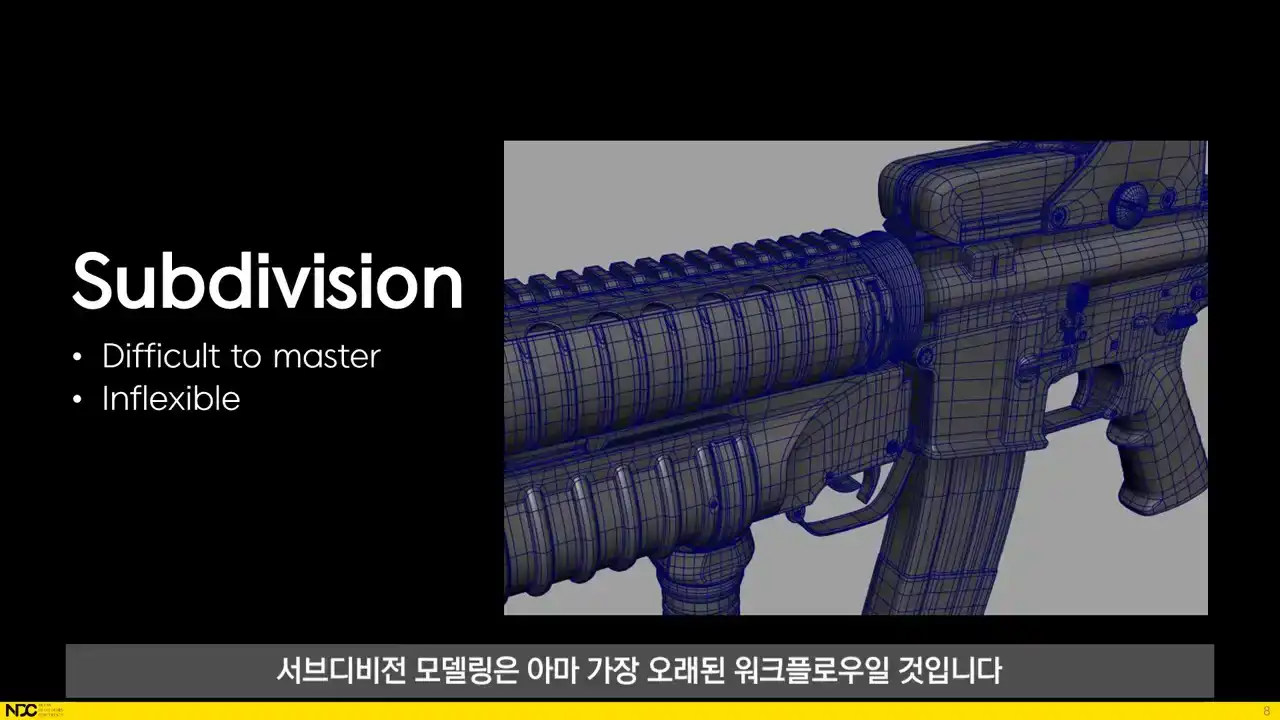
For creating high poly hard surface assets, subdivision modeling is perhaps the workflow that's been around the longest. If we want to create assets fast and easily, it does, however, come with some pretty deep issues. Making complex shapes through subdivision modeling is quite difficult, and it's a technique that takes a lot of time to master. It requires a deep understanding of topology, and then, what's worse, if you want to change those shapes, the artists will have to tear out that old topology and recreate a new one for the updated shapes. The ability to add crease weights to edges made subdivision modeling both easier and more controllable, but it's still dependent on a good topology, which is the most time-consuming part of the process. Probably the second most common workflow, which really provided a meaningful change
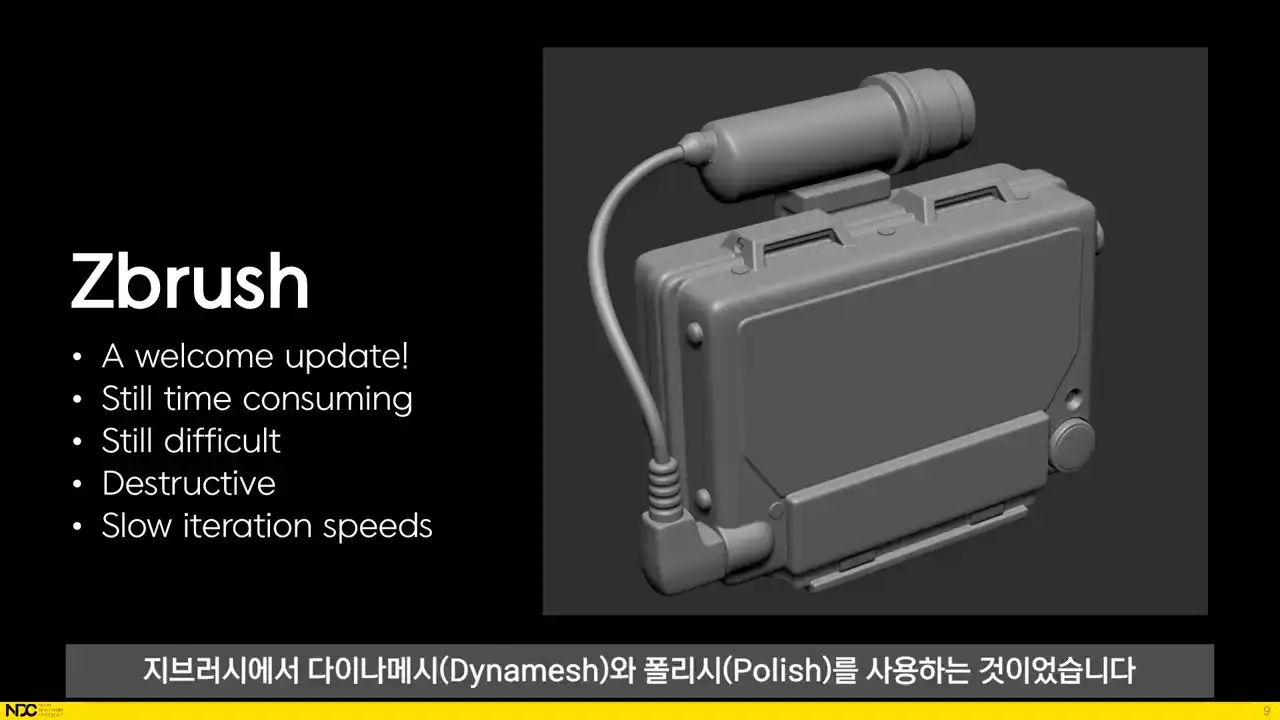
in how to achieve good-looking high polys, was using DynaMesh and Polish in ZBrush. It got rid of a lot of what makes subdivision modeling difficult and time-consuming. The artist no longer had to care about the underlying topology of the mesh, and the process can be broken down to simple mechanical steps. First Dynamesh, then Polish, then Decimate, etc. The problem though is that it's still time consuming. The user still has to go through the steps for each part of the asset. And it's still moderately difficult since the artist needs to know a bit of ZBrush. And more importantly, the process is destructive, meaning the user has to go through each step again if updates are made to the input geometry.
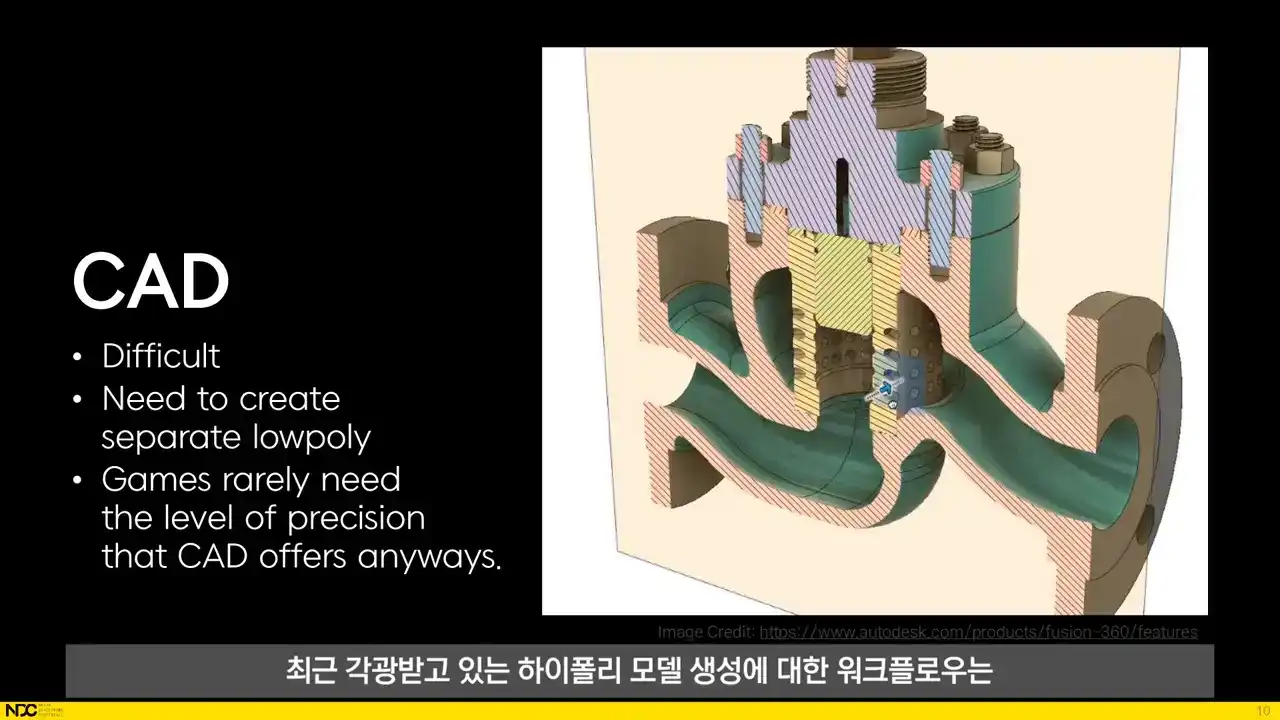
A workflow for creating high poly models that's been gaining traction recently is using a CAD software like Fusion 360. It's really cool and can give insanely clean and precise results that actually goes way beyond what we even need for games. But it too suffers from the artist needing to learn a separate piece of software, and And an additional problem is the need to create a low poly that's separated from the high poly.
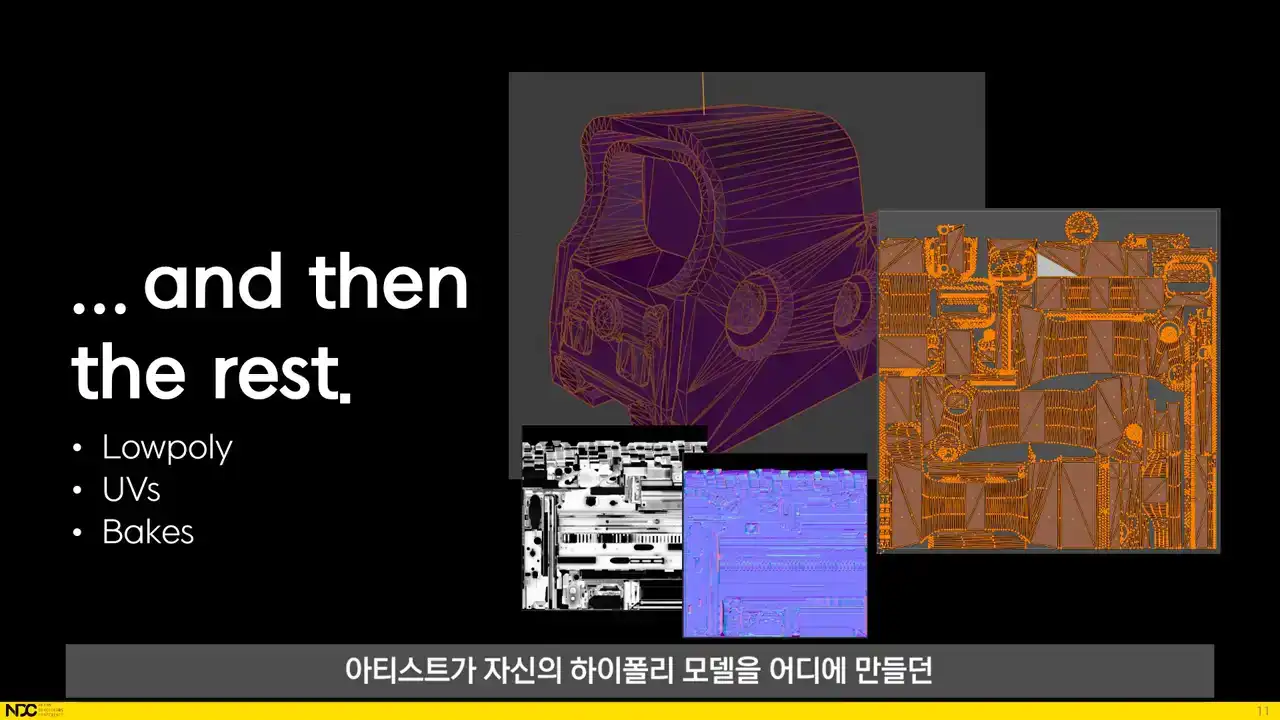
No matter where the artist has created their high poly models, they need to create a low poly that has to closely match the high poly while still being separate from it, and then UVs for that low poly, and then setting those meshes up for baking over information such as normals and ambient occlusion.
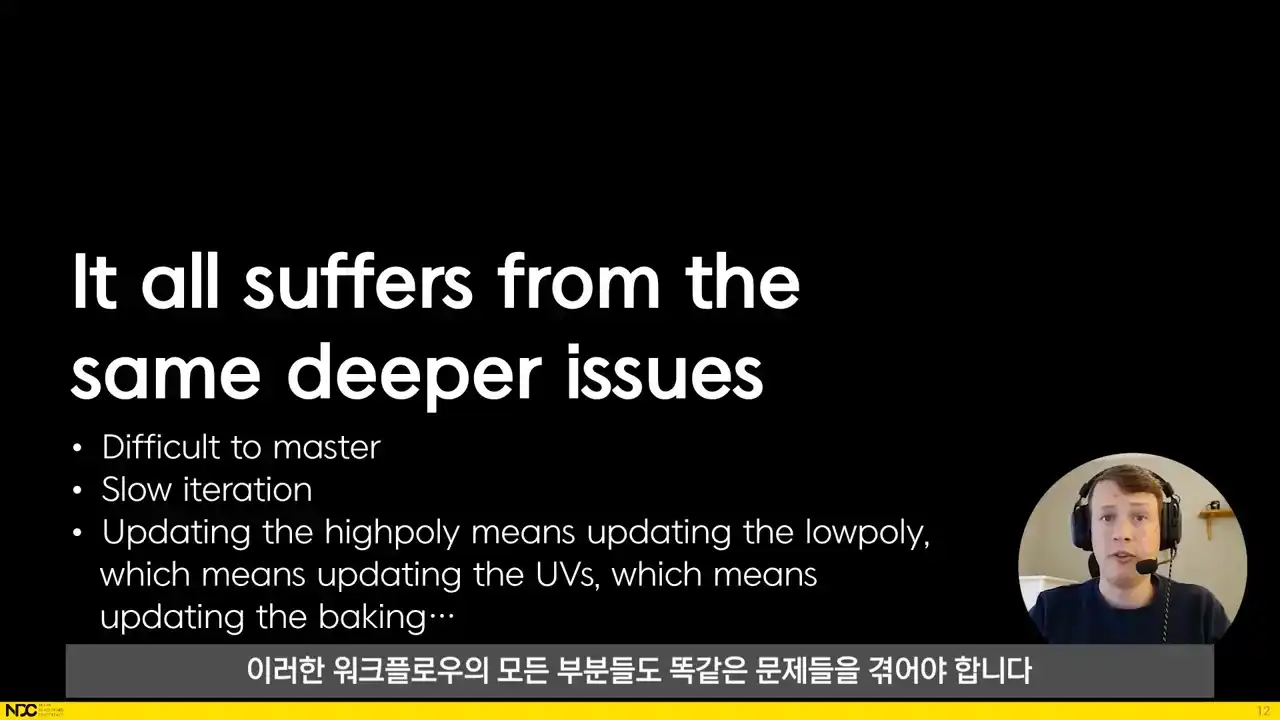
All parts of these workflows suffer from the same deeper issues. They're difficult to master and the iteration speed is painfully slow since each step has to be gone over again whenever something changes in a previous step of the process. And things have a tendency to change during game development. But since there is nothing truly artistic about UVs or baking or most of the technical steps of creating a high poly model, there is no reason why humans should spend time on those tasks. Since they're all very rule-based and repetitive, they're perfect for automation. That brings us to the process that we've been developing at Embark. What we do is we run a sequence of processes through a procedural dependency graph in Houdini It a very powerful system that makes the entire process highly modular and easy to adjust Here what we striving for when working on improving the hard surface process. We're standardizing the inputs and results in order to simplify the workflow for the artist and to unify the look of the final assets. This way we can keep a high quality across the board while keeping a similar look and feel for all assets and at the same time make the process easier for individual artists. We want to minimize manual work. This means that we want to remove all manual steps like export and import and all steps that have been manual up until now only because there haven't been automated processes to take care of those steps. A lot of time is often spent on learning new pieces of software and getting content from one piece of software to another. That's why we want to make sure that our artists can do their work where they're most comfortable inside of Blender. There is also no need for individual artists to have control in all of these automatable areas. Instead, decisions such as Texel density, amount of padding between shells, baking settings and more can be set in the tools themselves. Fast iteration times is perhaps the most important point. We need to be able to make changes to assets without it eating up a big part of our time budget. Solidifying quality improvements means that as new techniques are discovered to raise quality, it shouldn't be tied to the know-how of individuals. Instead, it should be near impossible for artists to create a worse result than what the best of us can accomplish. And finally, the toolset and workflows should be the same across all types of hard surface assets in order to make working on multiple different types of assets easier for the artists. Now we'll take a quick look at what it looks like in practice before going into what's going on behind the scenes.

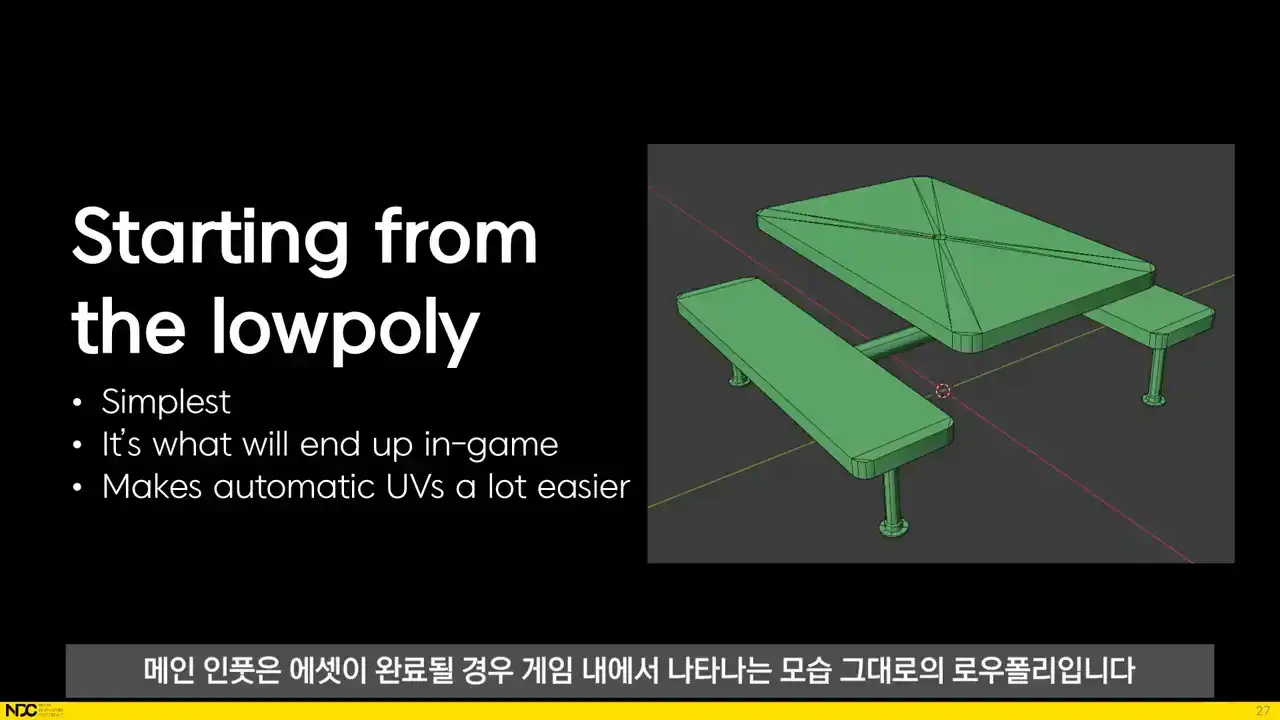
Let's quickly run through the workflow from the perspective of an artist using the tools for a simple asset like this fast food restaurant table. First, the artist models the simple shapes of the low poly object as it is intended to appear in the final in-game version. Then it's time to model some additional input geometries. Here are the Boolean objects created for this asset. A few small subtraction cylinders for the holes in the feet and the larger intersection volumes for where the wood is supposed to be. And then some planes are added that are used for slicing the wood into separate planks. For additional details, some boxes are added that designate the areas where welds for the metal frame will appear. And finally a bunch of cylinders that will tell the process where to add bolts to the sides of the metal frame.
That's it for the setup. Now the artist presses the process button and shortly after the finished baked asset appears in the Blender viewport.
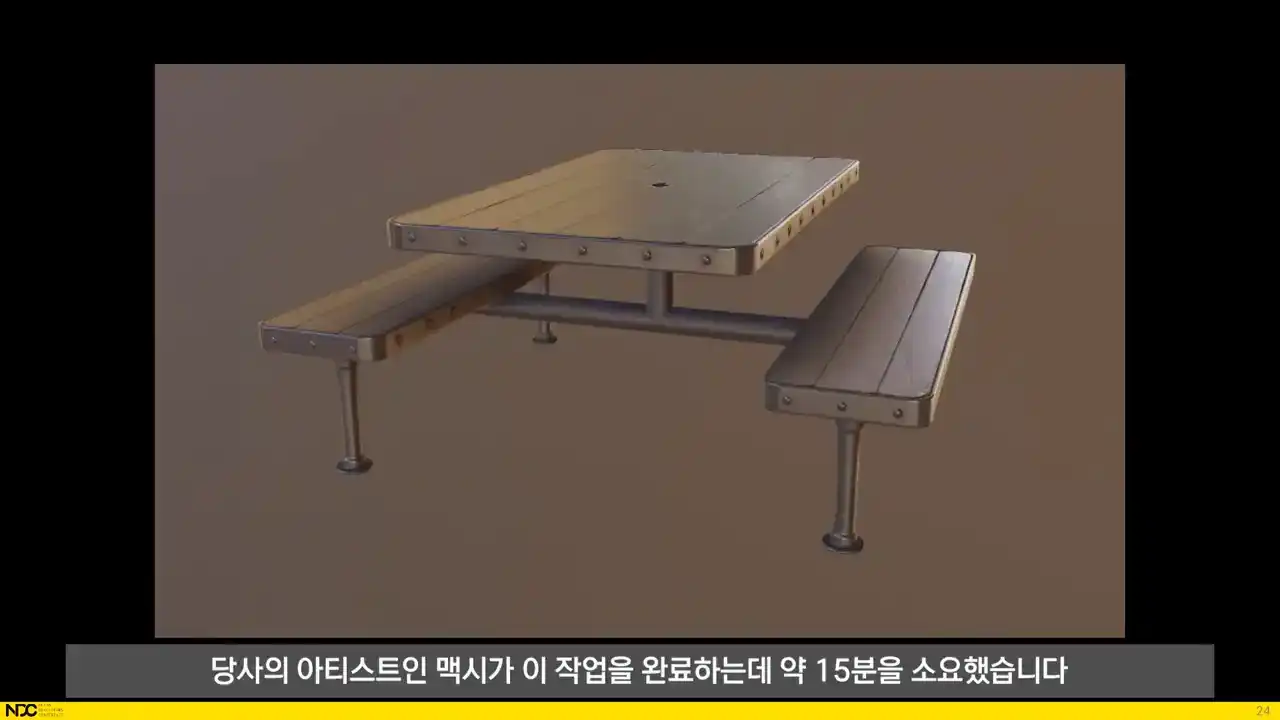
From start to a finished baked asset inside of Blender it took one of our artists, Maxi, about 15 minutes to complete.
So, that should hopefully have looked quite straightforward. Now we'll see what was really going on behind the scenes within the process itself. We'll see what happens inside of Houdini in each of the steps. And there's a lot of cool stuff happening that has taken quite some time to figure out and set up. But remember that the user never has to care about how any of this happens. The user experience is what we just saw with the fast food table. Build some simple input geometry objects and press process. So as we saw, the artist has a couple of different ways of telling the process what should happen. They can add the basic low poly geometry with hard edges, creases and UV seams set the normal way in Blender. They can also add Boolean objects like the small subtractions for the feet of the table or the larger intersection objects for the wood. Then there's the additional input geometry like
the boxes used to create the welds. The main input is the low poly exactly as it will appear in game when the asset is done. We started from the low poly for a couple of reasons. It's the only thing geometry wise that will make it into the game. It's also a lot easier for the artist to create than the high poly. Also, making good automatic UVs for a carefully handcrafted low poly is a lot more straightforward than doing it for a low poly geometry that has been generated from a high poly. And furthermore, creating a good looking automatic low poly from a high poly is also really difficult for hard surface assets that often require perfectly sharp or perfectly flat surfaces. Then, the user can input all the basic kinds of boolean objects that will change the appearance of of the high poly. Every non-boolean object can also be tagged as a subtraction boolean so that there's never any intersection between parts For the intersection boxes the brownish one to the left the user can also use different materials We also adding other types of input geometries
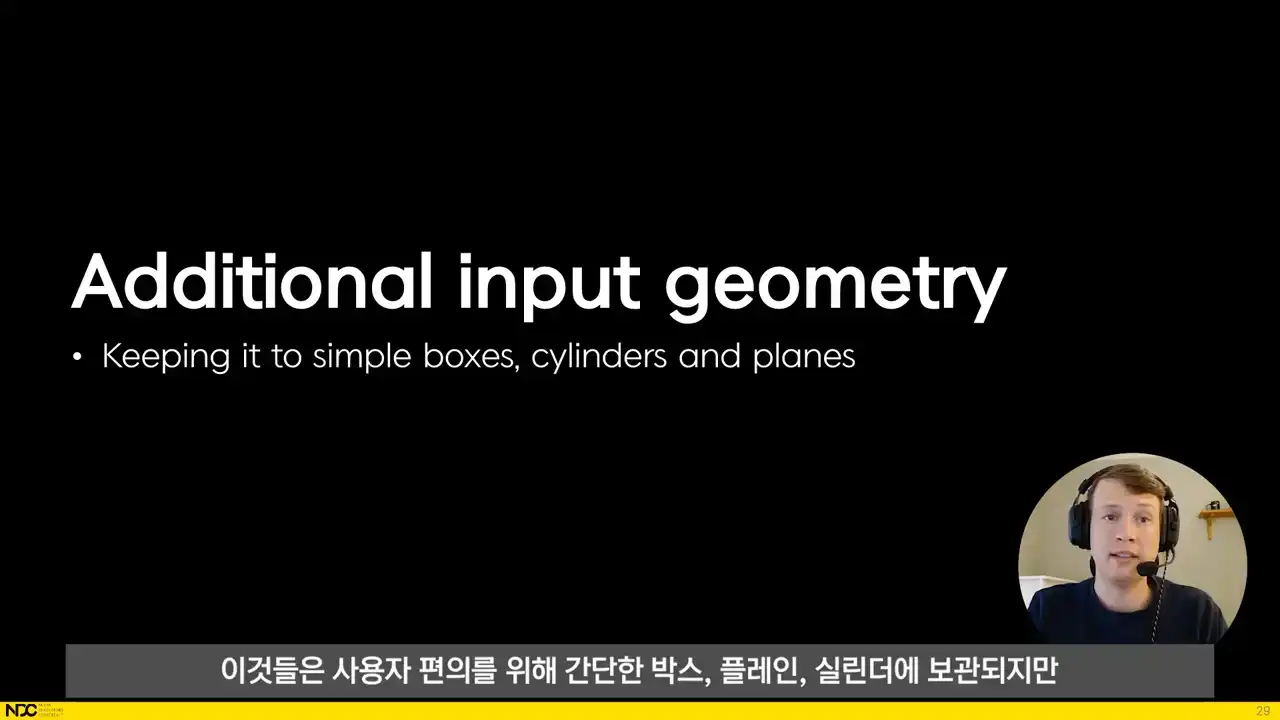
They're kept to simple boxes, planes and cylinders for the sake of user-friendliness, but they tell the process to do some pretty cool things. The artist can place cylinders that will generate bolts in the high poly process. The bolt types are set through our UI in Blender and all of the bolts are created procedurally in Houdini. The artist can also add boxes that tell
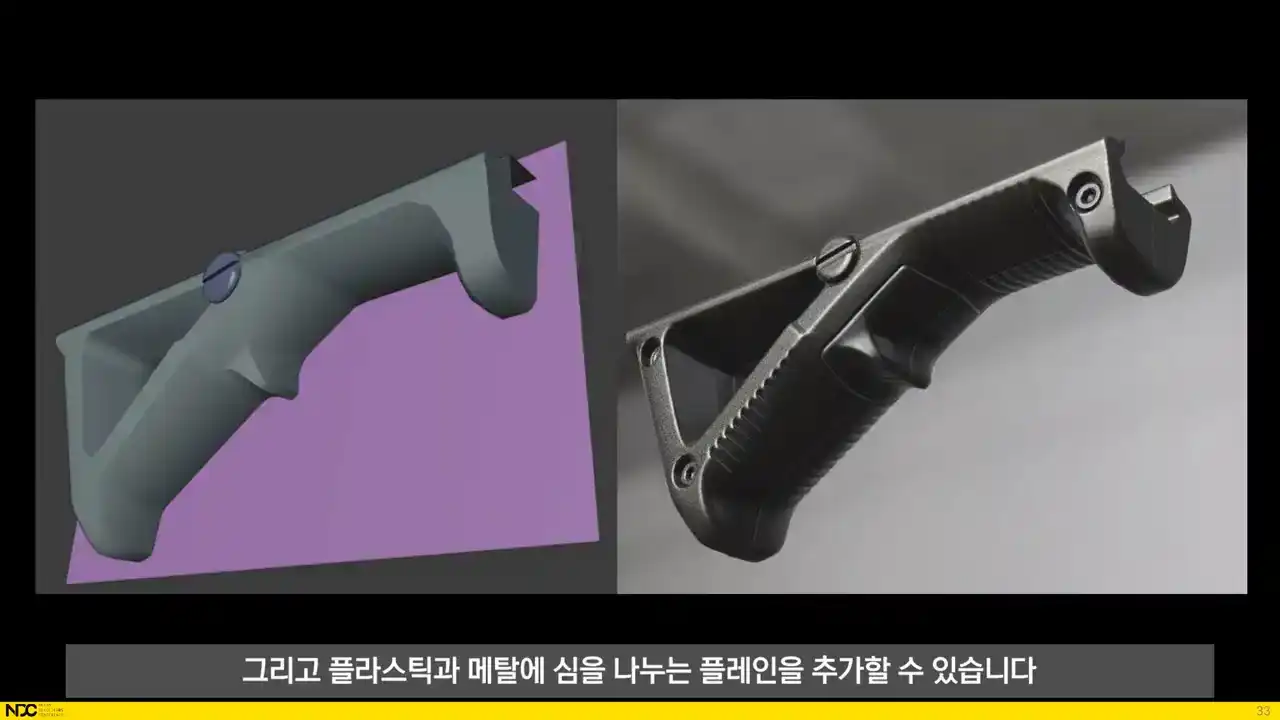
the process where to add welds for metal surfaces and plants that add cast seams for plastics and
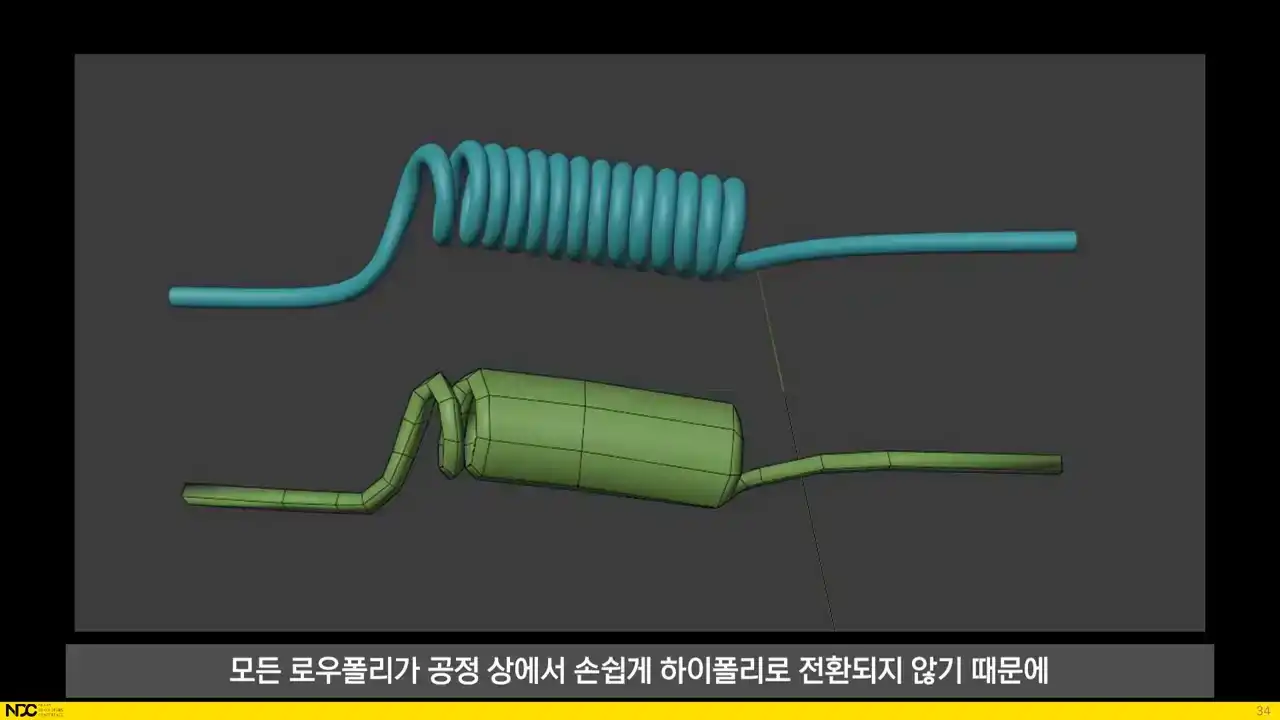
metals. The artist can also add any type of custom made high poly geometry, since not all low polys are easily converted to high polys in the process. Here's an example of where the low poly and the high poly are really different and hence the high poly will have to be built by some other means. We've noticed that these cases are surprisingly rare though. Next up are the UVs.
There is a high demand for good UVs for games. We want them to be tightly packed, but with enough padding to allow for good-looking mipmaps, which depends on the size of the final in-game texture. We also want an even texel density, neatly rotated shells, straightened shells and shells that are overlapped where possible. In our process the UVs are fully automated, but the artist still has the possibility to input custom themes, unfolds or layouts if need be. We have tried out existing auto-UV solutions, but since they were not giving us satisfactory results, we decided to come up with our own solution in Houdini. I'll now explain the steps that are run through for the automatic UV process.
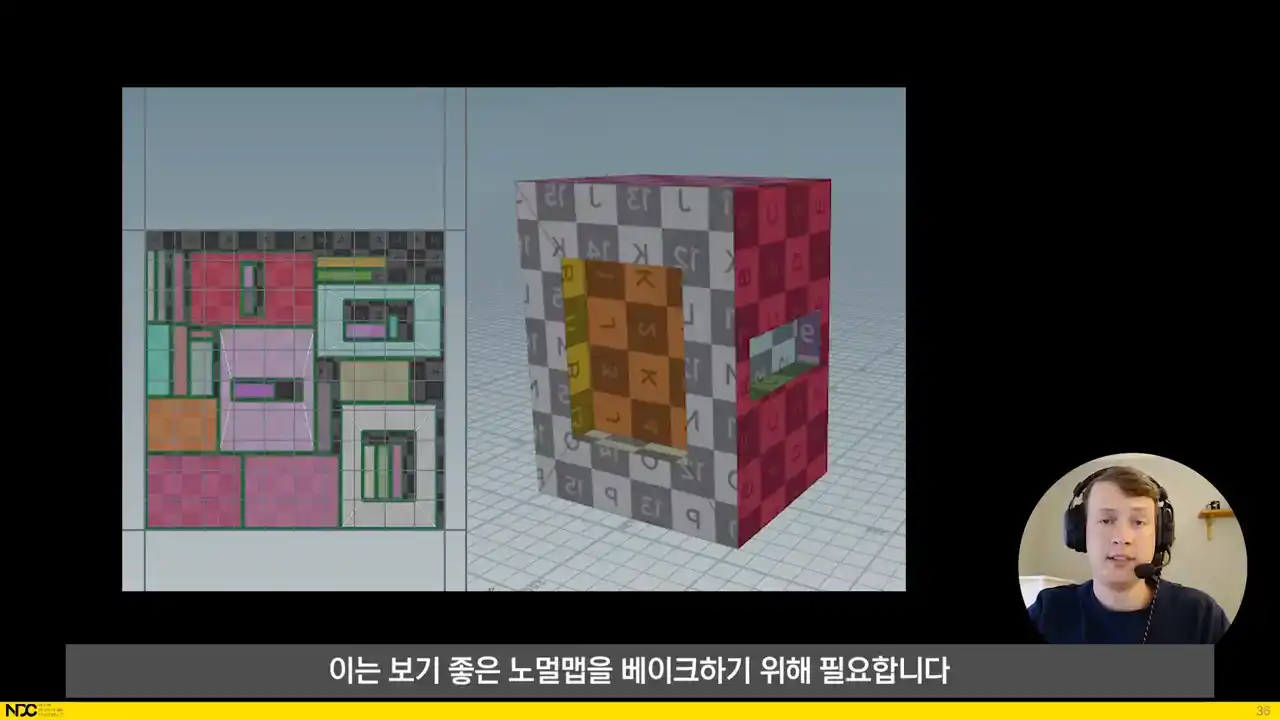
First, we split sharp edges, since it is needed in order to bake good-looking normal maps. We then sort shells by whether or not the resulting shells have distorted UVs after that initial cut.
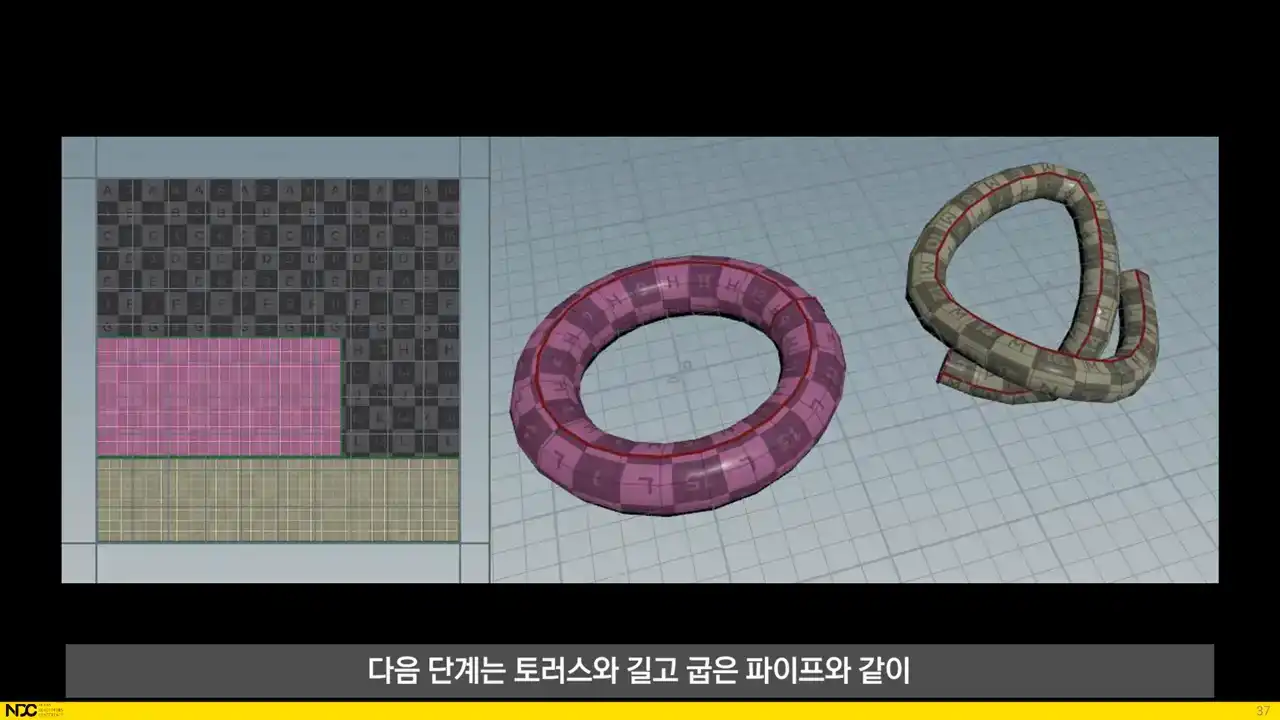
The next step is to find seams for more complex yet determinable shapes, such as torses and long winding pipes. We find what type of shape it is through analyzing the geometry of each separate UV island and treat each type of surface according to its own specific procedure. After that we find border points of the
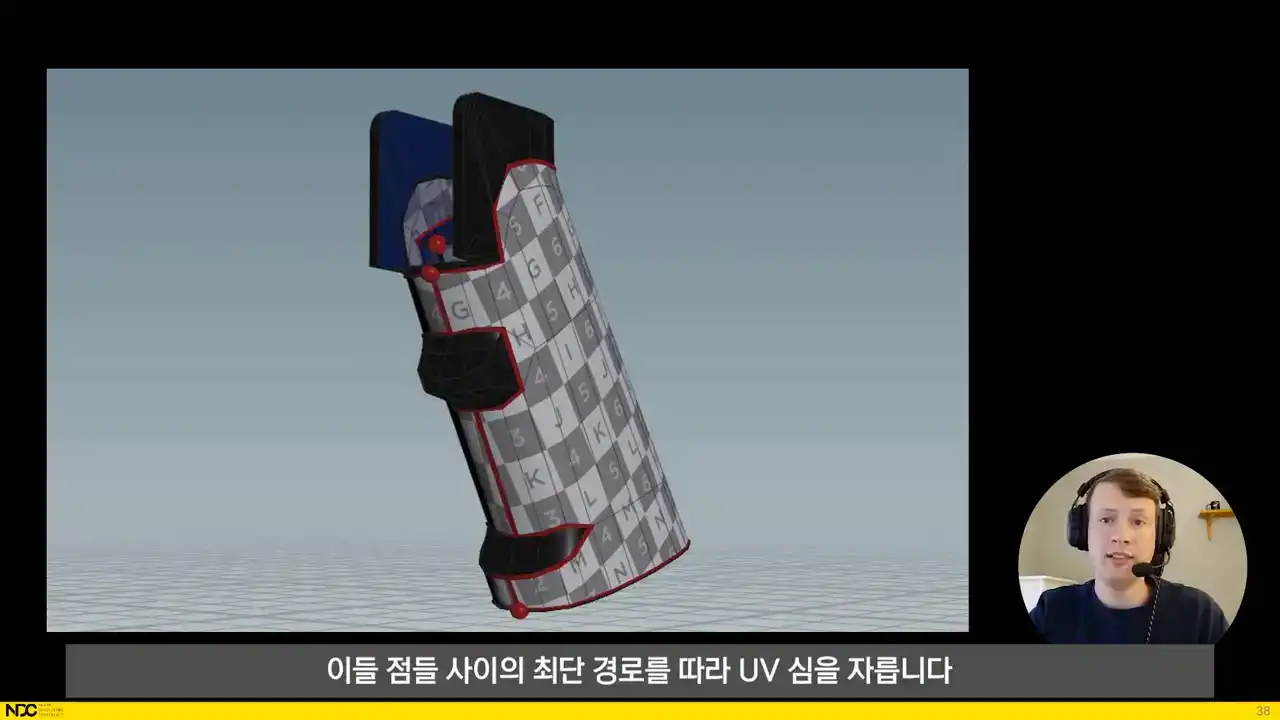
remaining distorted shells and cut UV seams along the shortest path between those points.
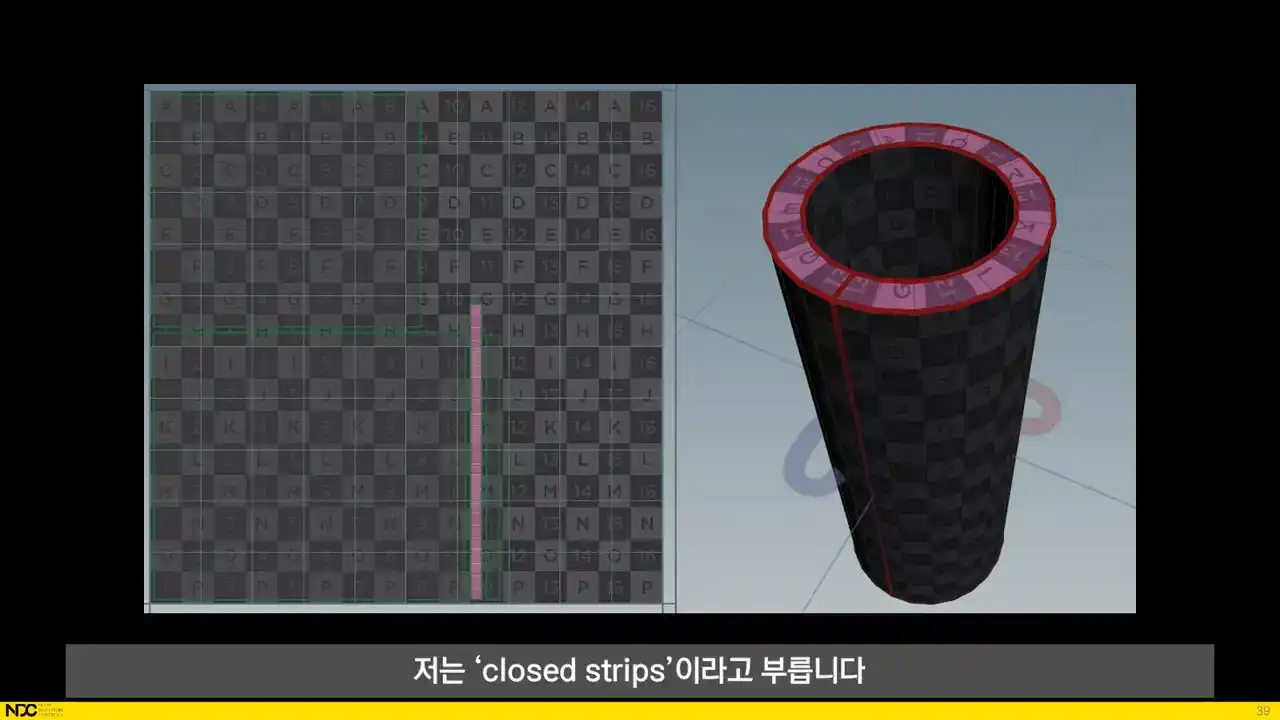
Something that we run into for non-distorted shells are what I call closed strips. We want to split them up so that we can straighten them and we do this in much the same way as for the distorted shells that needed to be split in the previous slide.
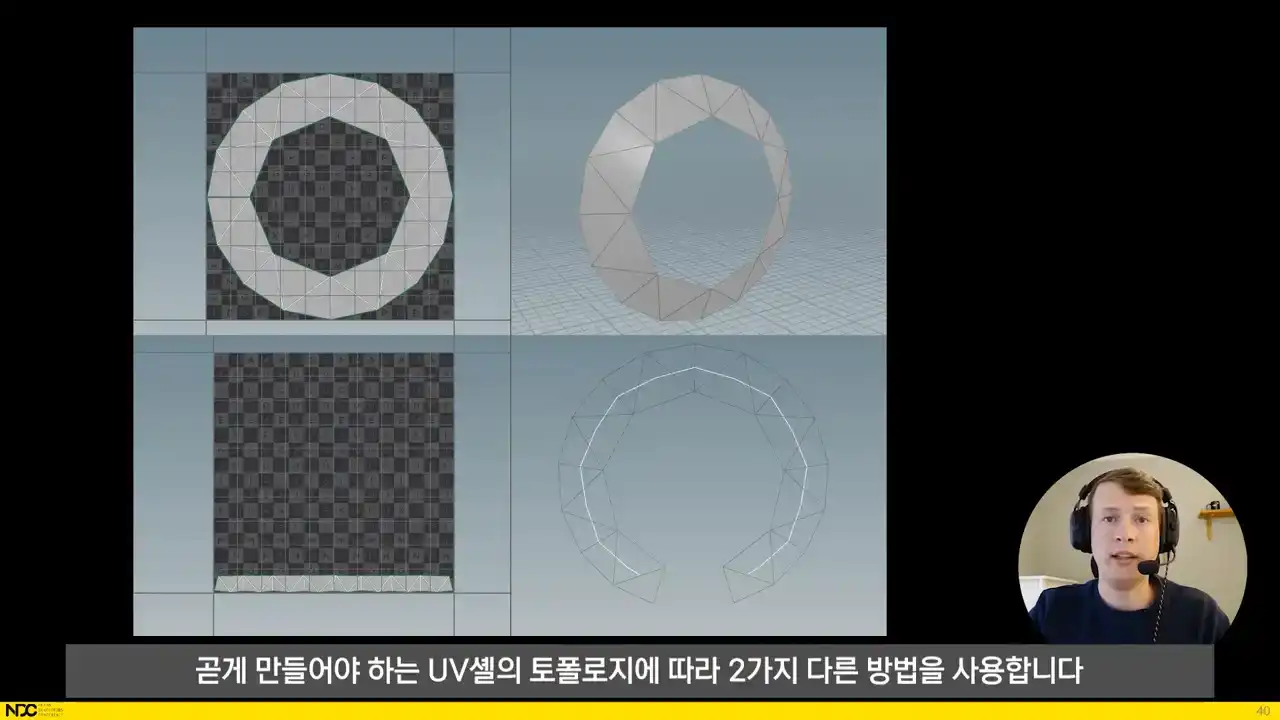
When it comes to straightening shells, we do it in two separate ways depending on the topology of the UV shell to be straightened. If the shell has a perfectly gridded topology, the shell can be easily laid out as a grid, but if the topology is more complex, we have to resort to a different method. In those cases, we create an interior skeleton for the shell, and then we bind the shell to the skeleton spline and straighten the spline instead. Lastly, before layout,
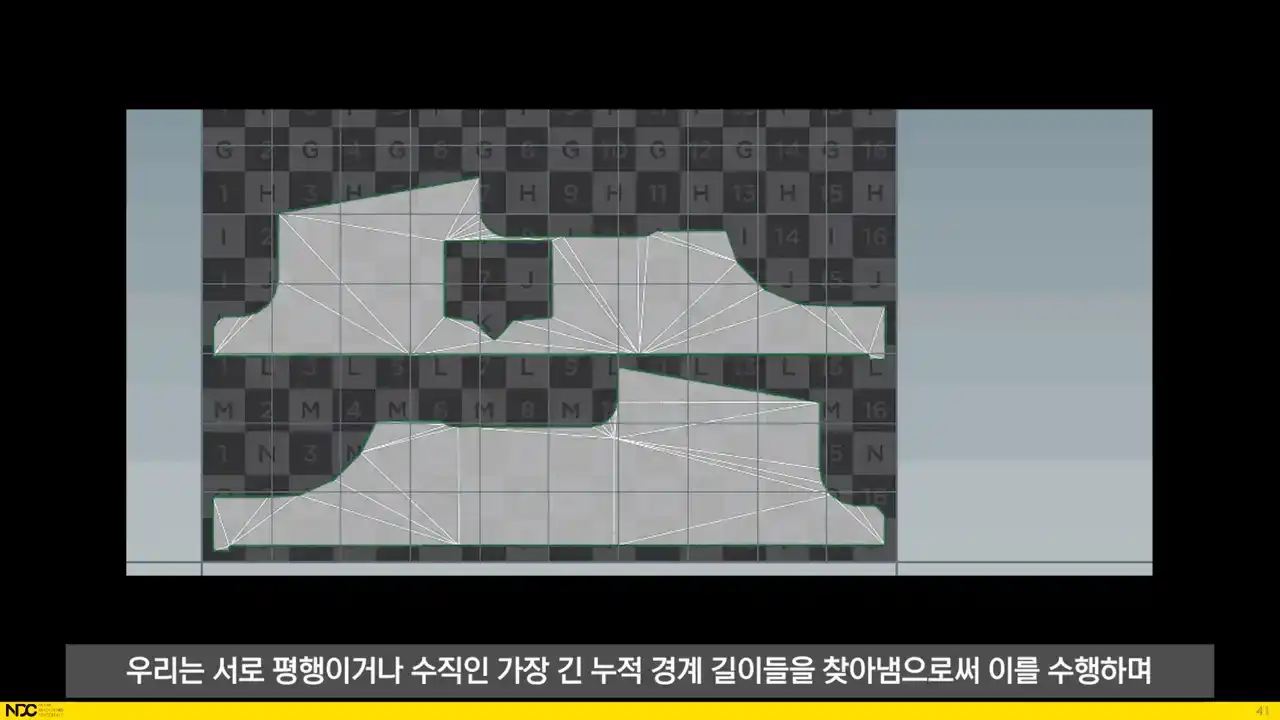
we need to rotate the shells properly. We do this through finding the longest accumulated border length that's either parallel or perpendicular to each other and then make sure that those edges are aligned with the UV axis. For the layout, Houdini's UV layout node
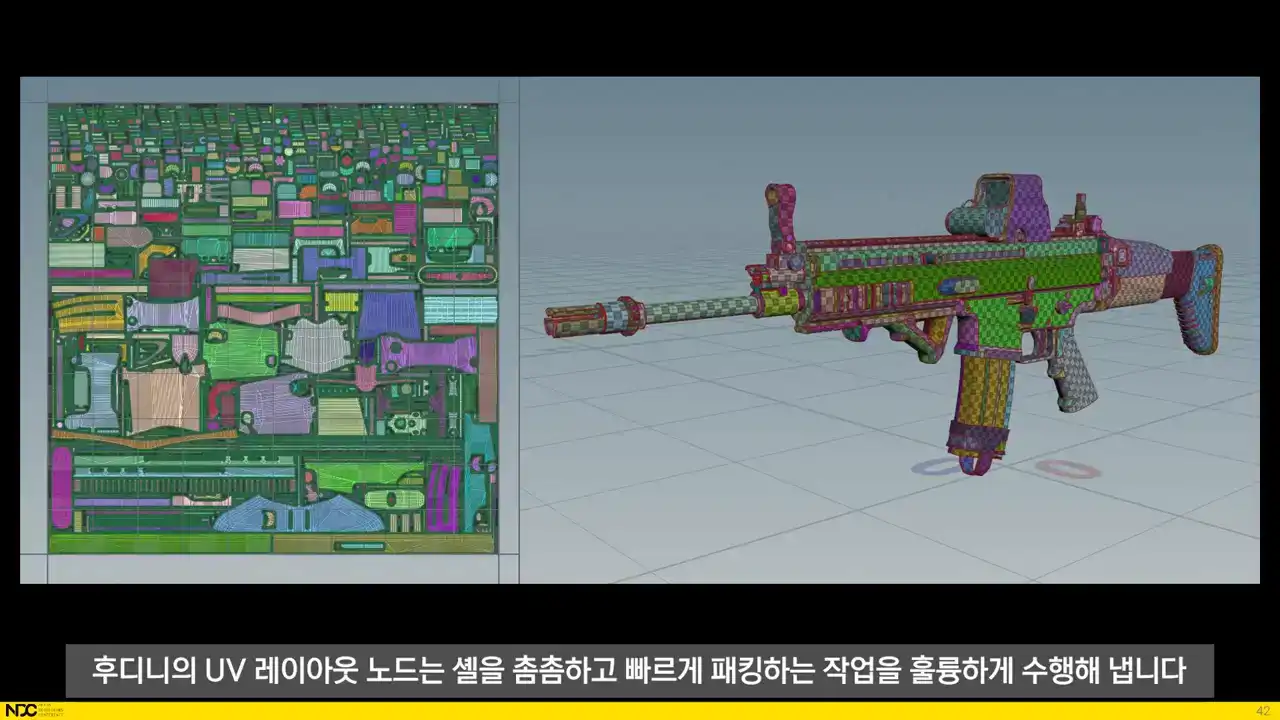
does an excellent job at packing the shells tightly and quickly. So what was left for us to set up was dynamic texture size depending on ideal texel density per object type, which also tells the layout how much padding is needed between shells, and dynamically finding out the optimal aspect ratio for the texture depending on those same factors and UV coverage.
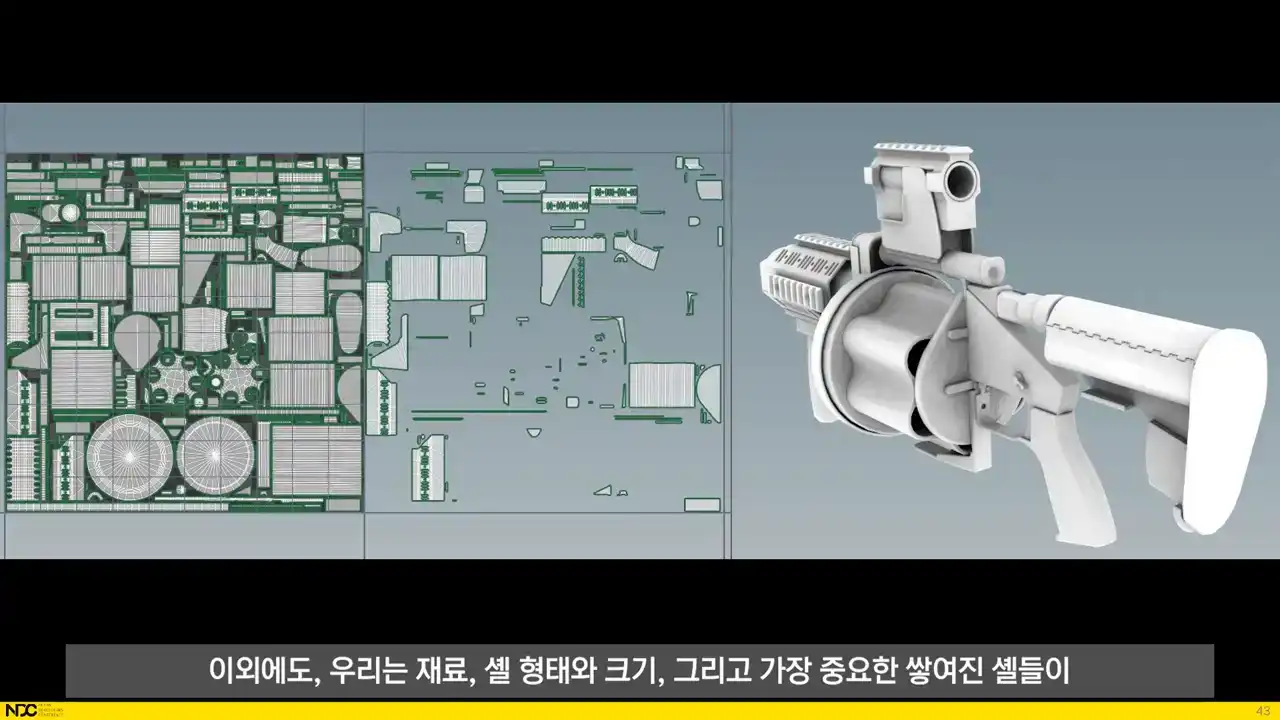
In addition, we're also overlapping UV shells based on material, shell shape and size, and most importantly, whether or not stacked shells will allow for a good looking ambient occlusion bake. We're also looking at implementing stacking based on 3D proximity, UV shell size and viewing angles.
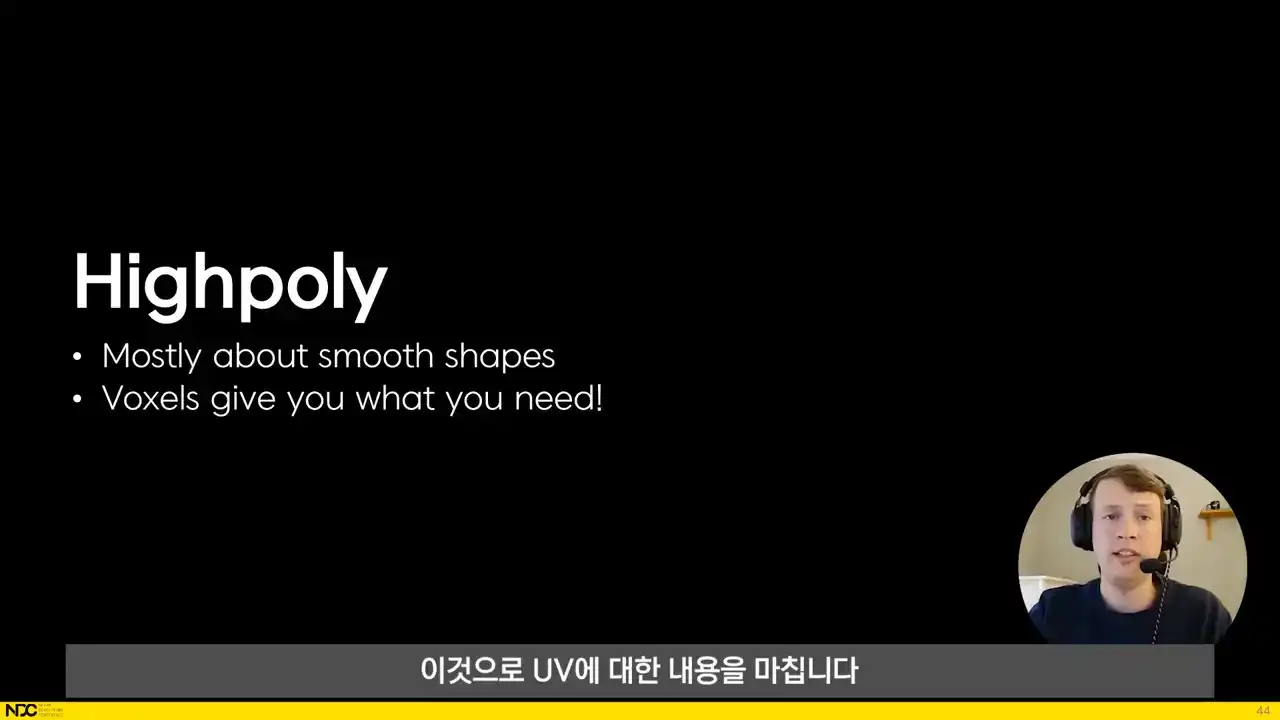
That was it for the UVs. For the high poly, most of what we're ever after is round shapes with smooth surfaces and smooth corners. And this is exactly what we get through subdividing and voxelizing the low poly in Houdini, which produces a very similar result to dynameshing a mid-poly geometry in ZBrush.
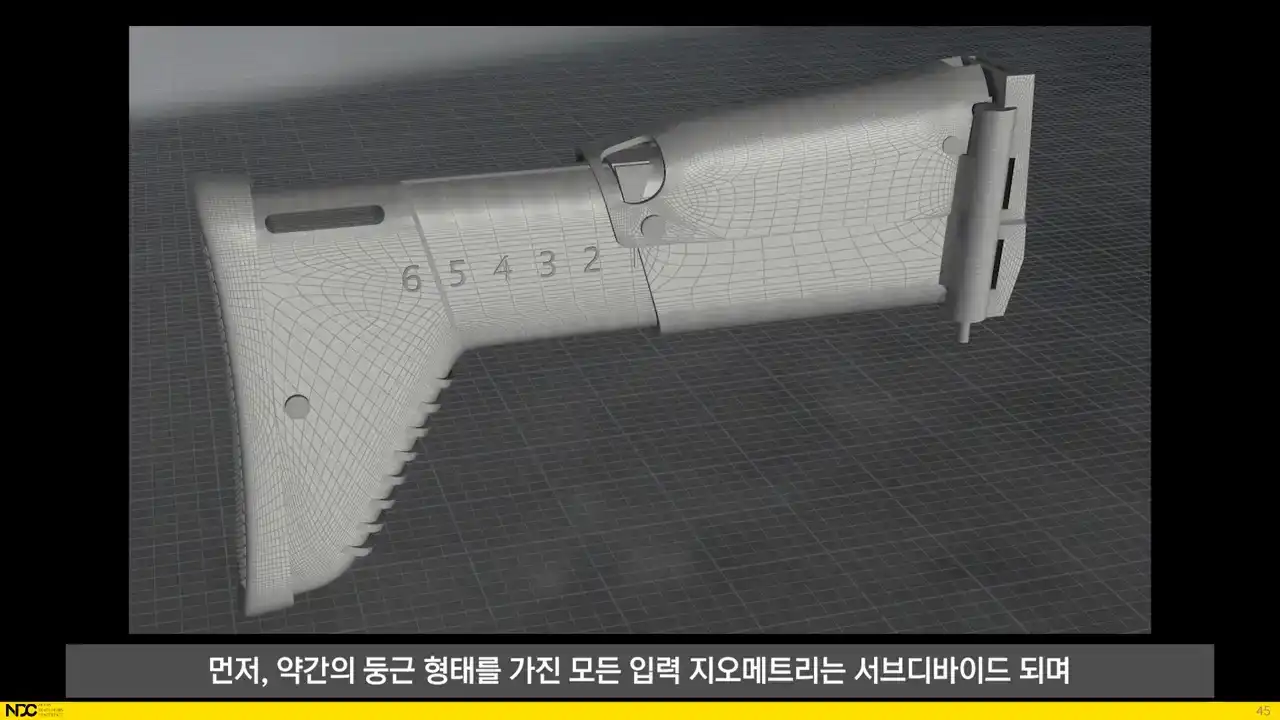
First off, all input geometry that has some roundness to it gets subdivided so that they become properly smooth since the jaggedness from the input geometry would otherwise show up in the high poly too When subdividing all hard edges are creased The result is that only the surfaces in between hard edges are rounded which means that any need for a standard subdivision topology for the low poly is very rare, and any minor pinching that may result from this will be smoothed out later in the voxelization step anyways.

Next up, the process applies the booleans to the subdivided geometry. Luckily, Houdini has a really solid boolean system that can handle the very heavy boolean operations for these densely subdivided meshes. We don't have to worry about what the resulting topology looks like either, since the voxelization process that happens later will work independently of the topological structure of the input geometry.
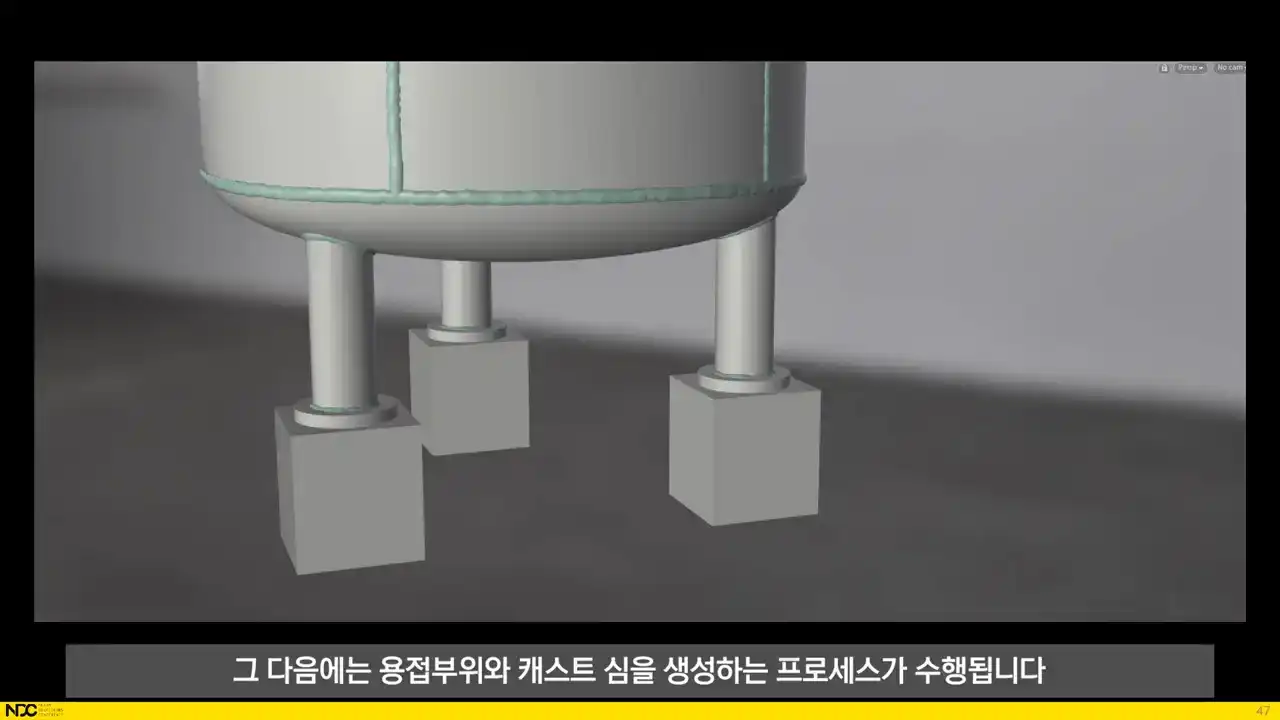
After that, the processes for generating welds and cast seams are run. It doesn't matter that there's a bunch of intersection and strange looking geometry, since it will all be voxelized later.
We're finally at the voxelization step. When everything has been converted into voxels, smoothing operations are applied to the volume before it converts back into polygons. This is what creates that final look of all edges being nicely beveled.
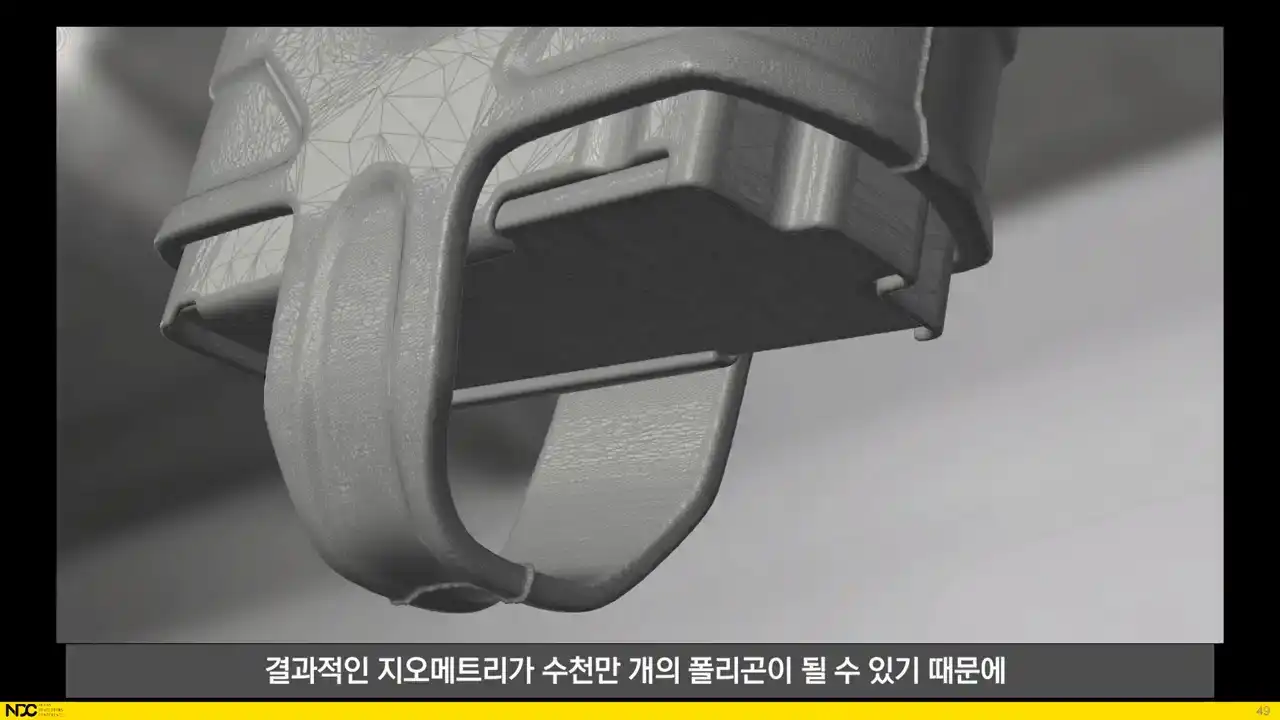
Since the resulting geometry can easily be tens of millions of polygons, a mesh reduction is being run in order to speed up the loading of the mesh for the baking process.
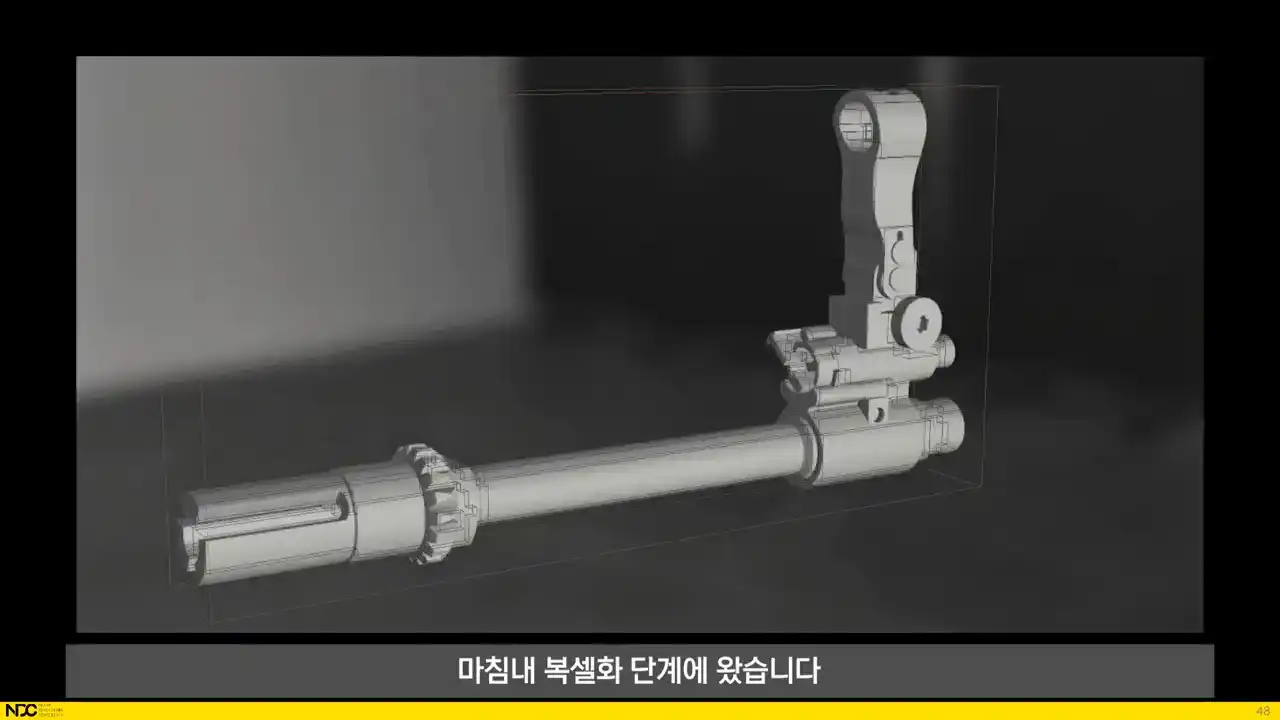
And that's it for the automatic high poly meshes. At this stage, when we have the UVs and the high poly generated, we want to have the bakes rendered out. Since the high poly is generated from the low poly, we don't have to manually match corresponding low and high poly pieces to each other, that's all taken care of through the process.
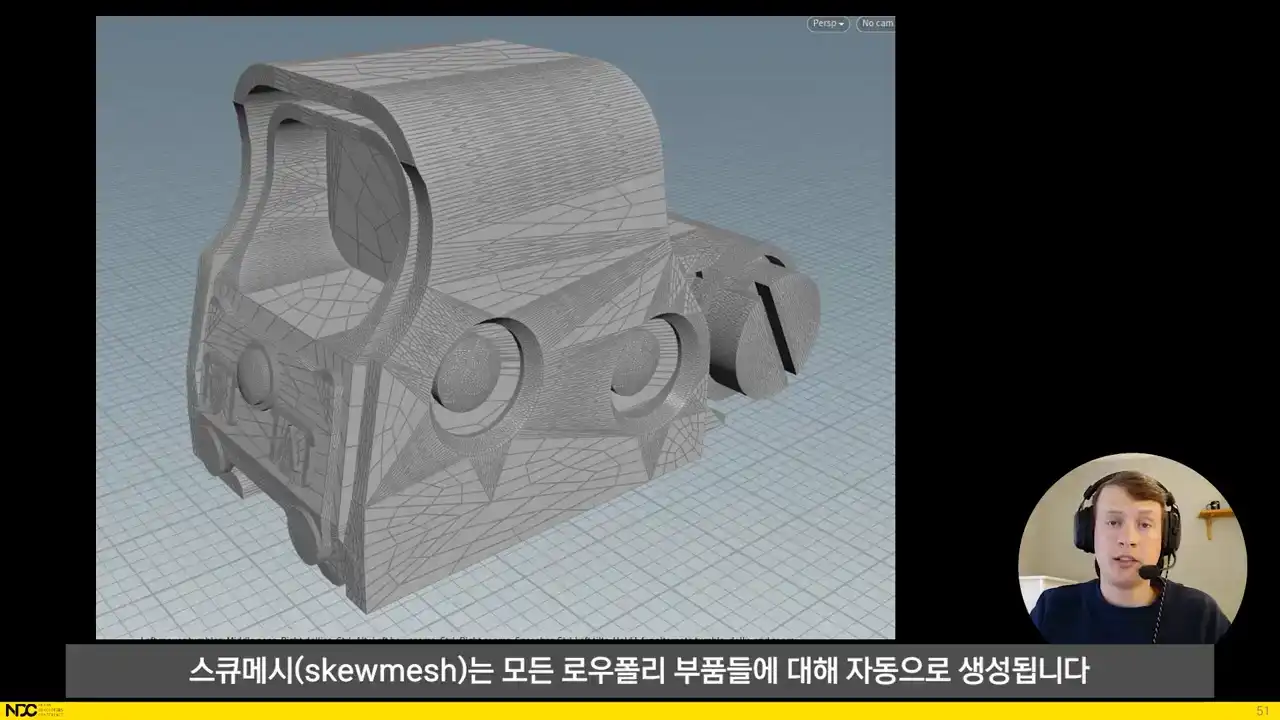
In order to avoid normamap skewing, a skew mesh is automatically being generated for all low poly
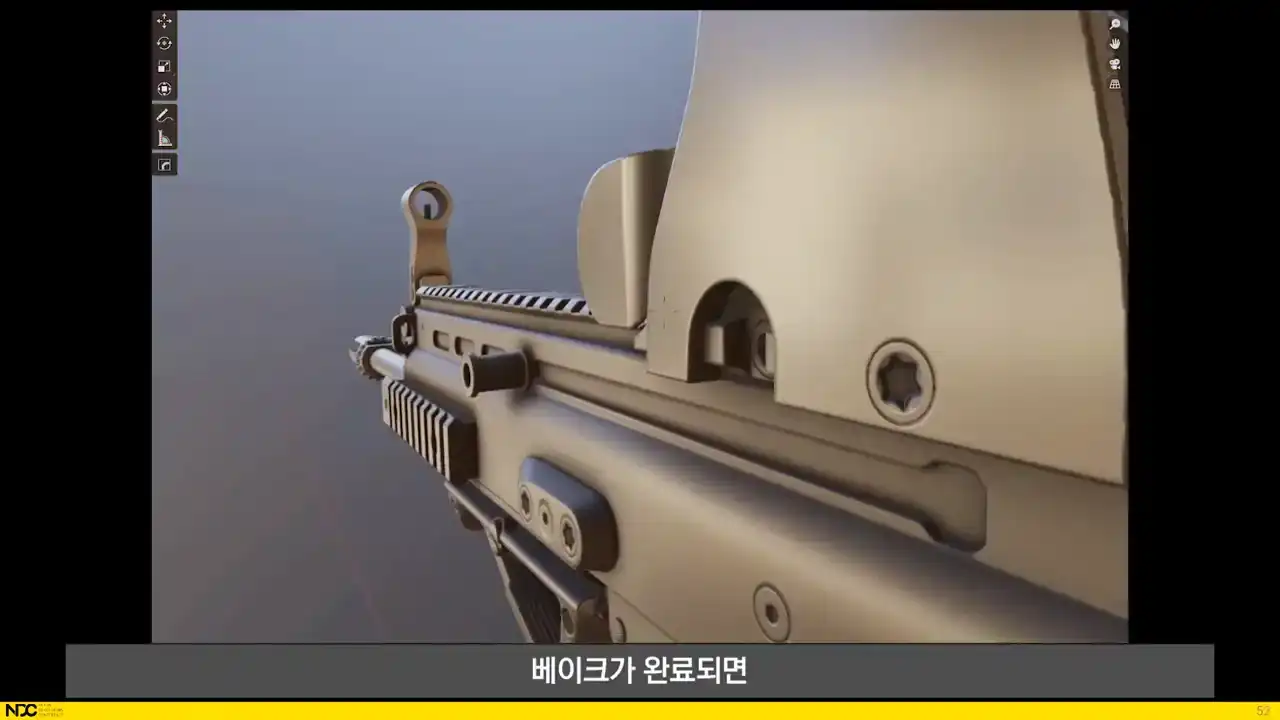
parts. And when the bakes have finished, the user gets the results right back into Blender with the
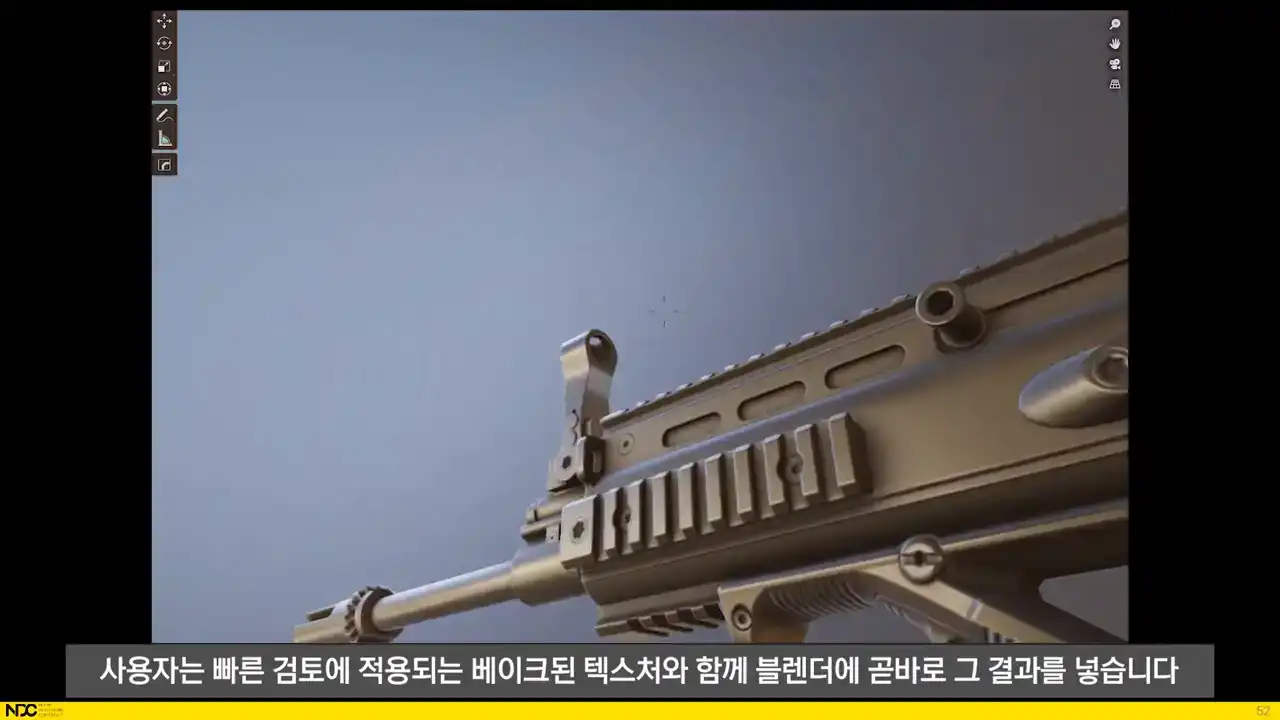
baked textures applied for quick reviewing. That's it for each of the larger processes.
Here are a couple of conclusions that we've come to at this point. Automation is great. Automating the non-artistic steps makes it possible to truly focus on the art aspect of what we do. Simplicity is great too. Most of the actual process is never seen by the user and they can quickly forget about all the technical stuff. And even though some of this might seem advanced or complicated to set up, everything can be broken down into discrete steps that can often have utility on their own, even before it's been put together into a full process. Hitchability really is key. Being able, for instance, to change the length of part of an asset and simply hitting process instead of having to manually adjust UVs, high poly and bakes results in radically different levels of exploration and momentum in the art creation process. Now that we have it up and running, considering a manual workflow is out of the question and we'll continue to develop this until we've completely run out of ideas. It doesn't seem like that is likely to happen for a really long time. We're still waiting to see if the black boxed nature of the process will in any way be limiting to the artist, since results can be difficult to predict without having a full understanding of what's going on behind the scenes. We're working on setting up easy to understand documentation, error messages for incorrectly set up assets, and easy to understand example assets. There are also lots of things that can still be done when it comes to previewing the results inside of Blender before processing by applying similar mesh modifications through modifiers. When it comes to the process itself, it is incredibly easy to debug and understand since almost all of it is set up with nodes in Houdini. Voxels are great, but really sharp meshes require dense voxel grids which can become slow to process. We've investigated baking rounded shaders as well, but they have their own limitations. I have a feeling that we might end up with a mix between both approaches in the future. There is still lots to do and the possibilities seem endless. We are working on a texture setup that uses the same mindset of really simple inputs and fully automated results. We're also working on automatically importing and setting up all kinds of assets in Unreal as part of the process and it shows great promise. Lastly, I want to say a huge thank you to Maxi Vasquez who has worked on this process with me since the start and to the rest of the team at Embark who made this all a reality. That's it! Please feel free to ask any questions and I'll try to answer them as best I can. Thank you!